1. Chain weave and center braid.

There are so many tutorials out there on how to do a t-shirt weave or braid. This shirt combines both; first the weave down the sides then a braid down the center. Here are a couple of excellent how-to videos:
2. WINGS!!!!!!

Start with a piece of paper the size of the back of your shirt. Fold it in half so your wings end up symmetrical. Draw out the basic shape you want for your wings in a few separate pieces.

Separate the wings into smaller pieces. Keep in mind that, like carving a pumpkin, you need spaces to keep it held together. Don't make the in-between pieces too thin or they might just rip through, and don't make the holes too big or you might end up with weird floppy parts. Also think about how gravity and the stretchiness of the shirt are going to affect the design.

Cut out the holes and decide where you want your wings positioned on your shirt. I ended up spacing the wings out about an inch on each side. I also decided to get rid of the inner top and bottom long pieces because they made it look more like a butterfly than wings.

Trace your pattern onto your shirt. I turned my shirt inside out so any markings would be on the inside, just incase. Most markings will come off in the wash or with some light brushing.

Make sure you like how it looks, then carefully cut out the holes with a sharp pair of scissors.

Turn it right side out and wear it like the awesome fairy/angel/demon you are! I've also seen a lot of skulls, but you can make so many other designs using the same idea.
3. Laced Sides
I took a picture of the finished product of this, but you can't see much from the head on view, so I'll just skip to the tutorial. This one was by far the hardest for various reasons and because of this, I don't have photos of some of the steps.
Start by figuring out how much extra space you have to work with on the sides. I first tried pinning the sides while on my dress form, but the pins came out when I tried in on myself. In the end, I ended up using safety pins so it wouldn't come undone, and just pinning it while it was on me. I started by pinning at the ribs, narrowest part of the waist, then at the curve of my hips on both sides so it was evenly spaced. I then pinned along the entire side on one side. I sewed a few stitches along the armpit and bottom cuff so the shirt wouldn't start to fall apart when I cut it. I cut off the side that was fully pinned, then used that piece as a pattern for the other side. If you want more of a gap when it's laced up, cut further into the shirt. Sorry I don't have pictures of this, it was kind of trial and error at this point.
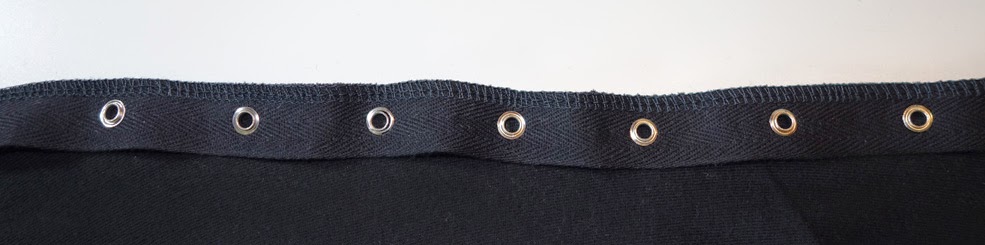
For the next part, I used some grommet/eyelet tape I had leftover from a costume I made years ago. I believe I bought mine on eBay, but you can find it on so many websites and in many fabric/craft stores. Or, if you're feeling really adventurous and/or already have the tool, you can just make your own row of eyelets along the shirt. Just make sure they're evenly spaced, and I'd recommend reenforcing the edge of the shirt with some sort of boning or interfacing. If you're going the easy route like me, line the 4 cut sides of your shirt with your grommet tape. Make sure the grommets are lined up front to back, and at the same places on each side. Pin the tape in place with the right sides together.

Since t-shirt material is stretchy, you may have to pull the shirt as you pin. It may look like the tape is bulging when in a resting position, but as long as you keep the shirt pulled while sewing, it'll all work out in the end.

Sew along the edge of the shirt. Be careful your sewing machine foot doesn't get caught on the grommets. If you only have a standard sewing machine, I recommend going over it a few times to make sure it's not going to separate. If you have a serger, serge along the edge for extra reinforcement.
Fold the grommet tape out flat and tuck it back under the shirt at the armpits. Sew along the armpits and bottom cuff so the tape stays in place. Then, lace it up! I found some black shoelaces on clearance for 99¢ so I used those. You can also use fun colorful shoelaces, ribbon, etc. You can even change out the color depending on your mood. You can lace top to bottom or bottom to top. Make knots, make big bows. Since I had 2 shoelaces for each side, I laced from the top down to the middle, then from the bottom up to the middle for a cool effect.

When I have more time, I'd also like to do something with the neckline of this to give it some more flare.
There are so many variations you can do with this. You could just do the bottom half of the sides, the entire back, a random angled section along one collar bone, etc. Instead of leaving the gap open, you could sew in a contrasting color of fabric. Come up with your own ideas and let me see them!
BONUS!!!
Here are some other shirts I've altered. Unfortunately since they were done in the back of the Sprinter on the first tour, I don't have step by step photos.
Logo tank-top: I cut the bottom and sleeves off a One-Eyed Doll logo shirt. On the inside (again, because of marks) I found the center, then measured 3 even spaces on each side of it. I drew lines of equal lengths at each interval, following the curve of the neckline. I then simply cut along the lines. The gaps are created by the stretchiness of the shirt.


Side ties: I believe this shirt was a left over, size large, and I wanted something a little more fun and form fitting. First I cut off the neckline, being careful not to cut off the One-Eyed Doll logo. This created a fun, boatneck that sometimes when moving becomes a fun off-the-shoulder 80's look. I especially like wearing this shirt with a bra that has hot pink straps :)
I think I cut even spaced 1/2" strips along the sides of the shirt. I started a few inches below the armpit and ended at about my hip. I simply cut those strips in half, then tied the 2 halves together. The pictures don't do this shirt justice. It's super awesome.


So that's it! There are so many ways to alter a simple t-shirt. I'm looking forward to seeing you guys on tour and seeing what you've done with your shirts!
Awesome! Thanks for sharing! <3
ReplyDeletethis is amazing, I can't wait to try these out.
ReplyDelete